

If you sell online with Odoo, the payment step is where the money actually changes hands. Get it right and customers pay in a few seconds, invoices mark themselves as paid, and your accountant stops chasing you for missing bank lines. Get it wrong and you end up with paid orders stuck in “pending”, duplicate invoices, and a reconciliation mess at month end.
The good news is that Odoo already ships with ready-made connectors for most of the big payment gateways. You rarely need to write code. What you do need is a clear plan: which provider to pick, how to set it up, how to test it safely, and how the payments should land in your books.
This guide walks through all of that in plain English. It is based on the official Odoo 19 and Odoo 20 documentation, the setup guides published by the payment providers themselves, and the issues that come up again and again in real Odoo rollouts.
Quick summary
- Odoo has built-in connectors for around 20 gateways, including Stripe, PayPal, Adyen, Authorize.Net, Razorpay, Mollie and Mercado Pago.
- You set them up under Accounting / Website / Sales › Configuration › Payment Providers.
- Odoo never stores card numbers. The gateway holds the card data, and Odoo keeps only a reference or token.
- Always test in Test Mode on a duplicate database before going live.
- If your local bank or wallet is not supported, a custom payment provider module can fill the gap.
Table of contents
- What a payment gateway does inside Odoo
- Payment providers Odoo supports out of the box
- How to choose the right gateway
- What to prepare before you start
- Step-by-step: enabling a payment provider
- Setup examples: Stripe, PayPal and Razorpay
- Key features to configure
- Testing without touching real money
- The accounting side: journals and reconciliation
- Card terminals for Odoo Point of Sale
- When you need a custom integration
- Security and PCI compliance
- Common mistakes and how to fix them
- FAQs
What a payment gateway does inside Odoo
A payment gateway is the service that takes a customer’s card, wallet or bank details, checks them with the bank, and tells you whether the payment went through. Odoo calls these services payment providers.
Inside Odoo, a provider is used anywhere a customer can pay online:
- The eCommerce checkout on your Odoo website
- The customer portal, where clients pay sales orders and invoices
- Payment links you send by email
- Subscriptions, where a saved card is charged every billing cycle
Each provider comes with a list of payment methods, such as Visa, Mastercard, Apple Pay, iDEAL, UPI or bank transfer. You switch each method on or off depending on what your customers use.
Here is what actually happens behind the scenes when someone clicks Pay Now:
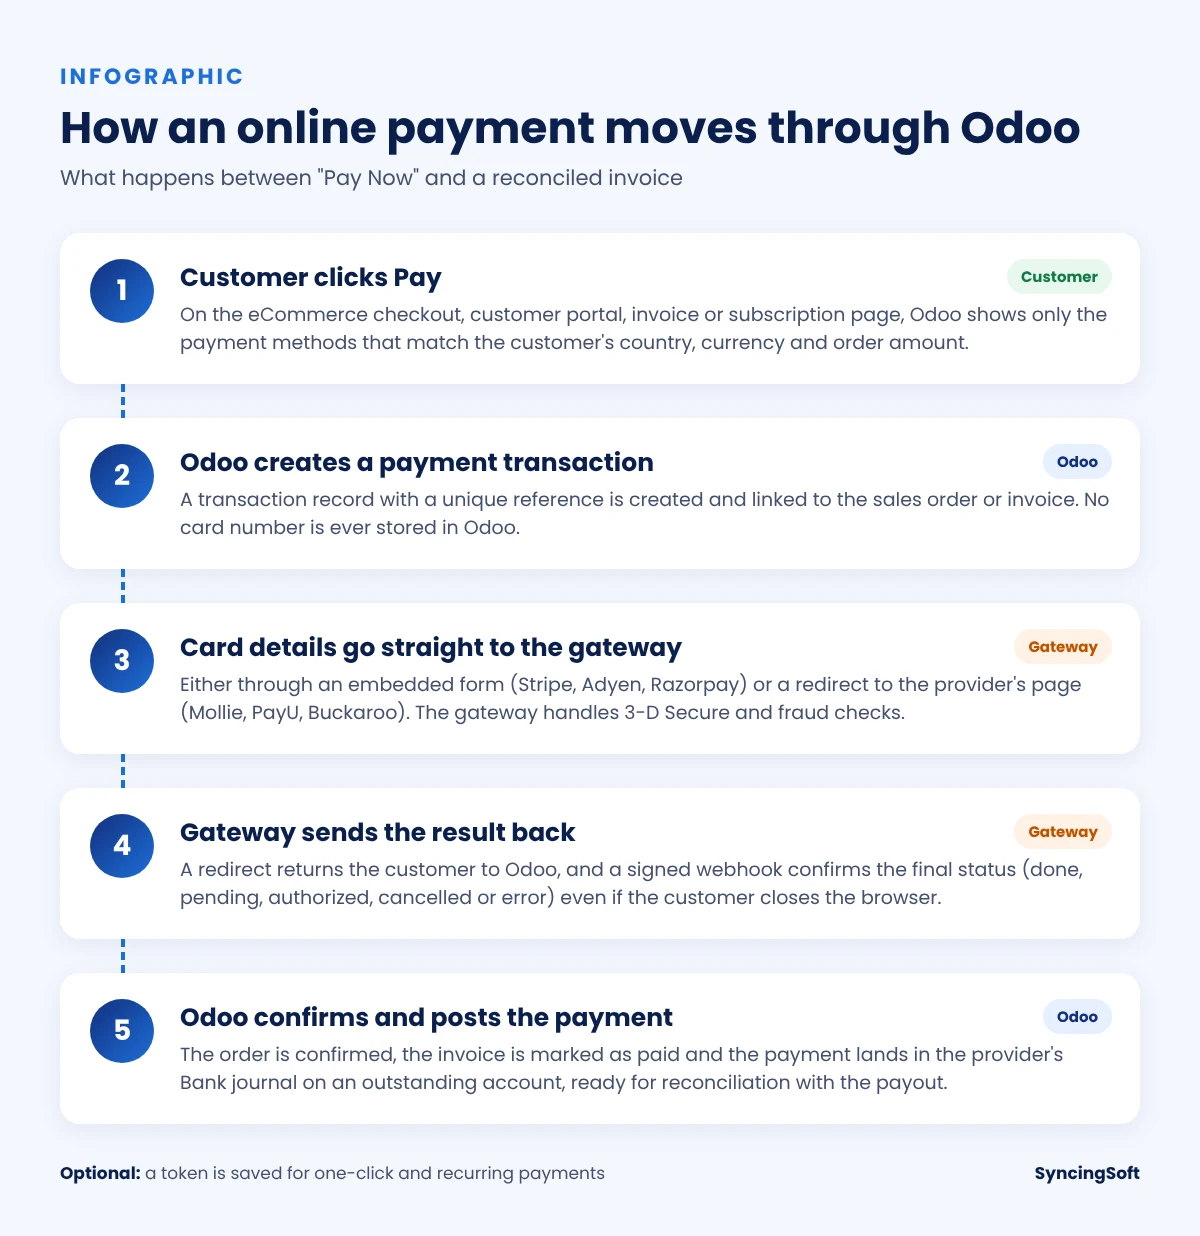
The step people most often overlook is step 4. The customer’s browser coming back to your site is not proof of payment. The webhook (a message sent server-to-server from the gateway to Odoo) is what reliably confirms the result. That is why so many provider setups in Odoo include a Generate your webhook button. Do not skip it.
Payment providers Odoo supports out of the box
According to the official Odoo documentation on online payments, Odoo 19 and 20 include connectors for these providers: Adyen, Amazon Payment Services, AsiaPay, Authorize.Net, Buckaroo, DPO Pay, ECPay, Flutterwave, Iyzico, Mercado Pago, Mollie, Nuvei, Paymob, PayPal, PayU, Razorpay, Redsys, Stripe, Toss Payments, Worldline and Xendit.
They do not all work the same way. Two differences matter most:
- Where the customer types their card. Some providers (Stripe, Adyen, Authorize.Net, Razorpay, PayPal, Toss Payments) show the payment form inside Odoo. Others (Mollie, PayU, Buckaroo, Worldline and more) redirect the customer to the provider’s own hosted page and then send them back.
- Which advanced features are supported. Saving cards, manual capture, refunds from Odoo and Apple Pay / Google Pay are only available with certain providers.
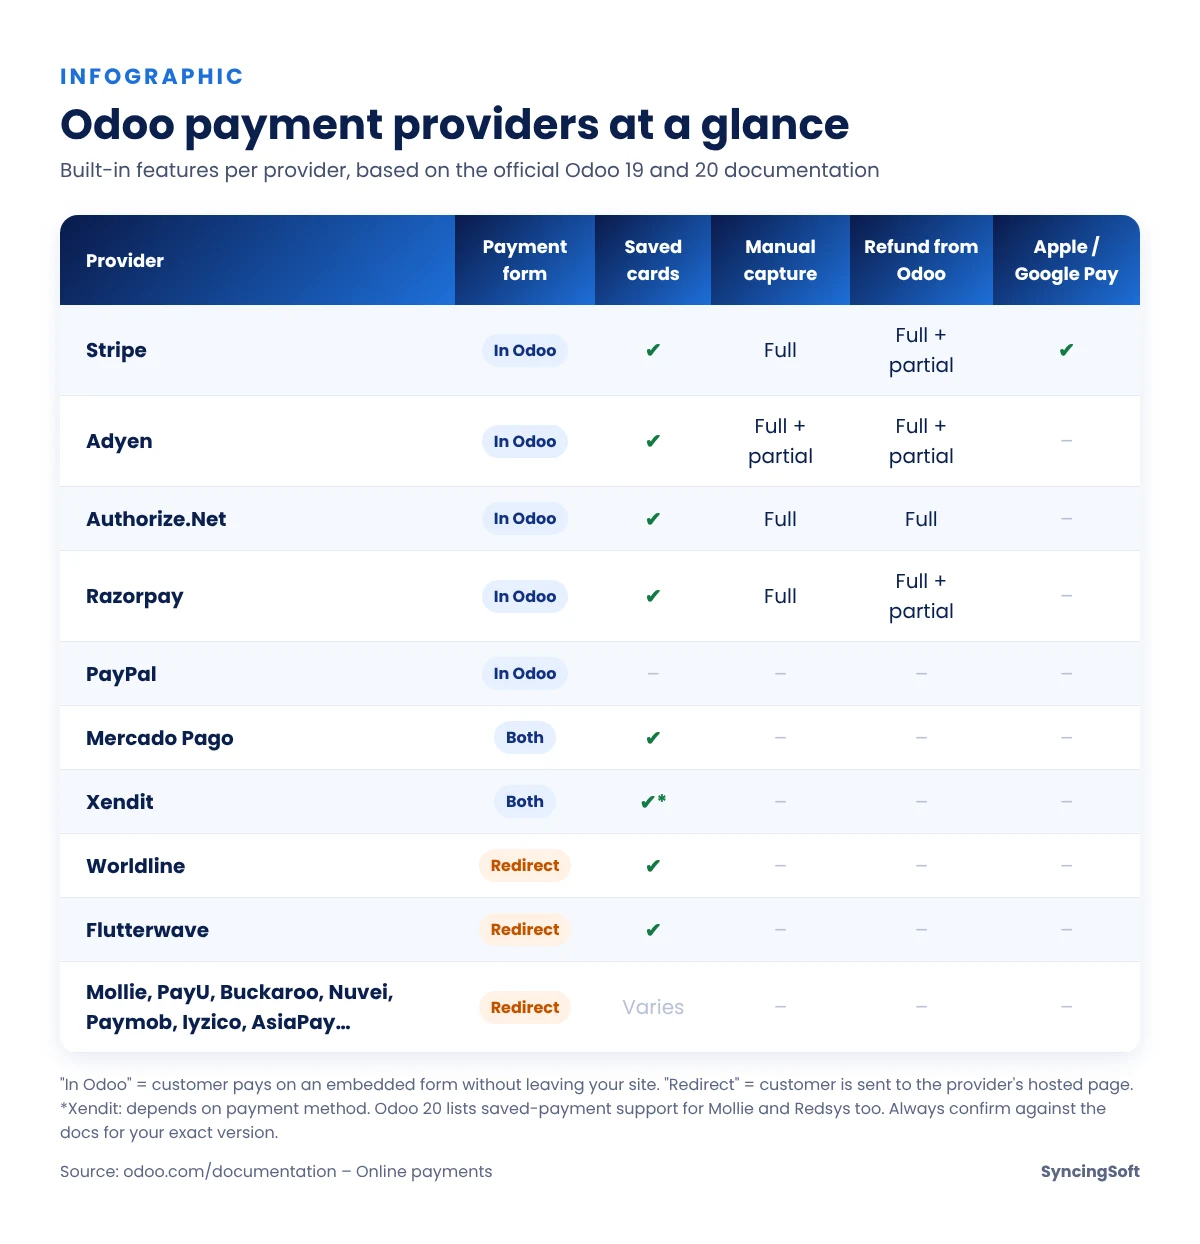
Odoo also includes a few options that do not rely on an outside gateway: Wire Transfer, SEPA Direct Debit, Pay on Site and Cash on Delivery. The Odoo 20 documentation adds Pay on Invoice to that list, for customers who pay after they receive an invoice. There is also a Demo provider that creates dummy payments, which is handy for training staff or testing a sales flow.
How to choose the right gateway for Odoo
The “best” gateway is the one that works well in your country, supports the way your customers like to pay, and does not eat your margin in fees. Before you sign up anywhere, run through these questions:
- Is it available where your business is registered? Many gateways only onboard merchants from certain countries, even if they accept cards from everywhere.
- Does it support your currencies? PayPal, for example, works in over 200 countries and regions but only supports a set list of currencies.
- Which local methods do your buyers expect? UPI in India, iDEAL in the Netherlands, mobile money in parts of Africa, or Apple Pay for mobile shoppers.
- Do you need recurring billing? If you use Odoo Subscriptions, pick a provider that supports tokenization (saved payment methods).
- Do you ship later or take deposits? Then manual capture (authorise now, charge later) is worth having.
- How fast are payouts, and what are the fees? Compare transaction fees, refund fees, chargeback fees and currency conversion costs on the provider’s pricing page.
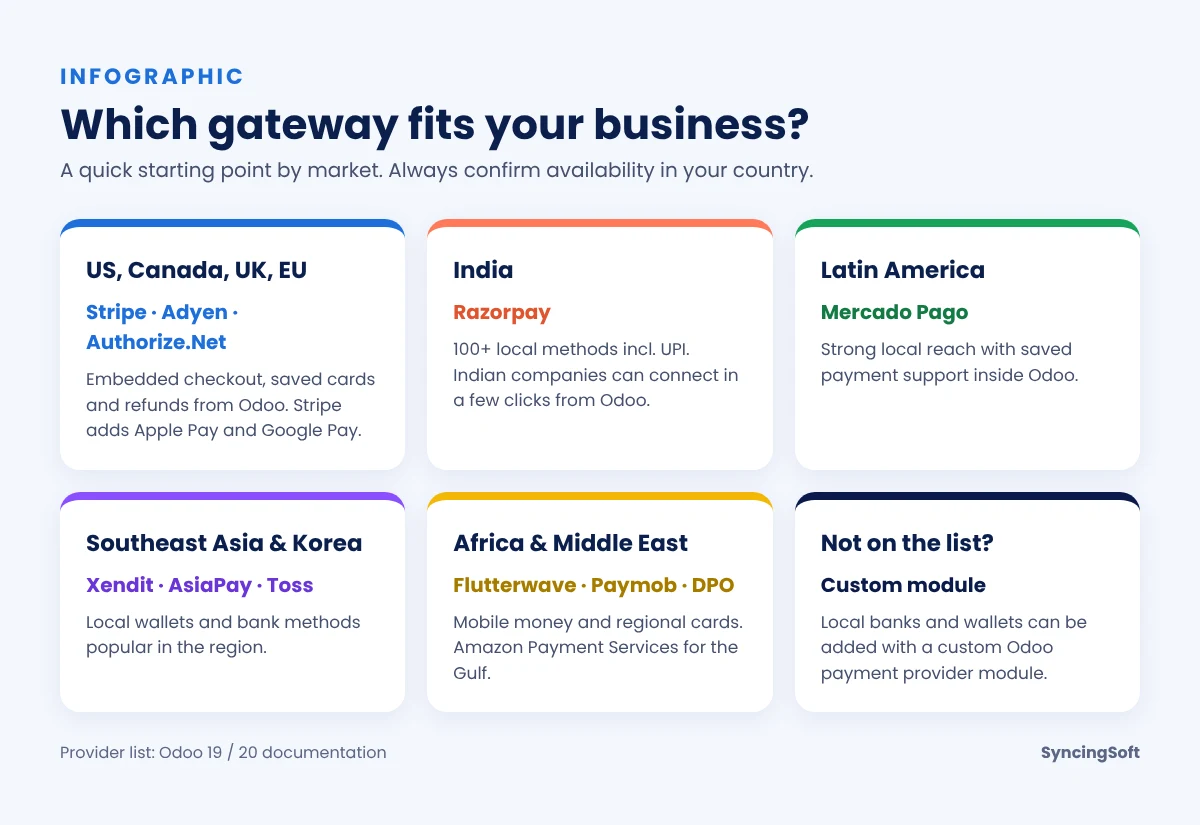
A practical tip: if you sell in more than one region, you can enable more than one provider. Odoo filters what each customer sees based on their country and currency, so a buyer in India can see Razorpay while a buyer in Germany sees Stripe or Mollie.
What to prepare before you start
Most delays in a payment integration have nothing to do with Odoo. They come from paperwork and access. Have these ready first:
- A verified merchant account with the provider. Business verification (often called KYC) can take anywhere from a few hours to a couple of weeks.
- Admin access to the provider dashboard, so you can create API keys and webhooks.
- Your Odoo company details filled in, especially the company email. Stripe’s quick onboarding, for example, needs it.
- A public HTTPS address for your Odoo database. Webhooks cannot reach a server that is only available on your office network.
- A duplicate or staging database for testing. Odoo itself recommends this to avoid messing up invoice numbering in your live database.
- A short list of who can see the secret keys. Treat them like bank passwords.
Step-by-step: enabling a payment provider in Odoo
The general process is the same for every provider. Only the fields in the Credentials tab change.
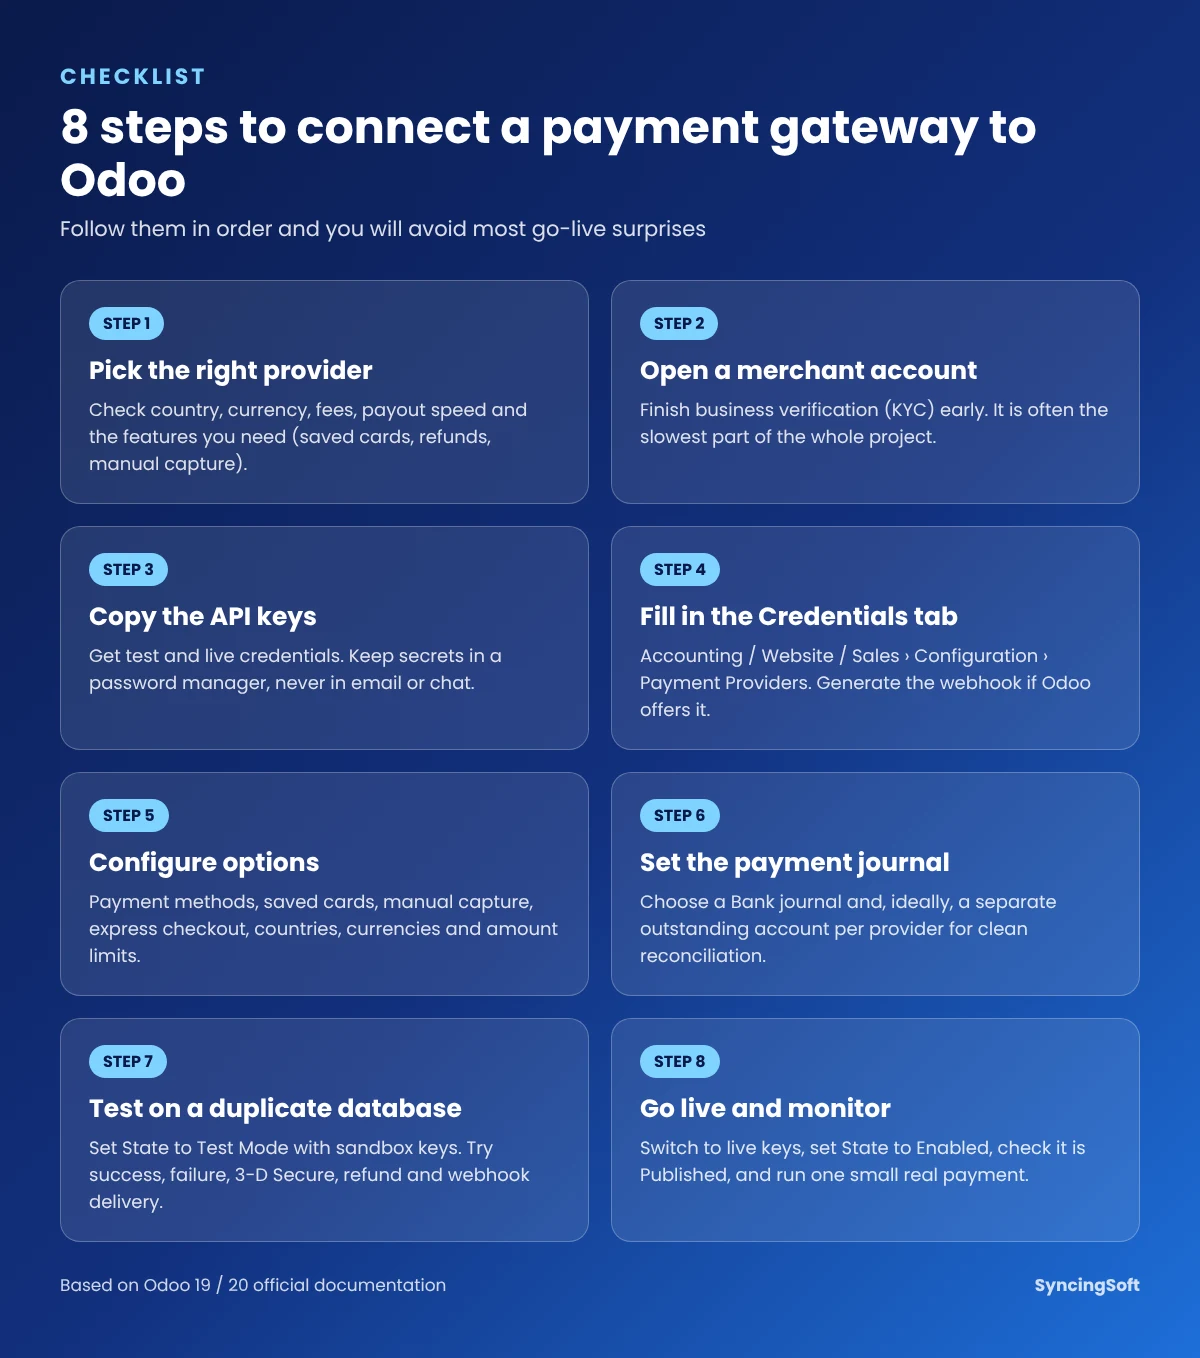
- Create your account on the provider’s website and get the API credentials meant for third-party platforms.
- Open the providers list in Odoo: go to Accounting › Configuration › Payment Providers. The same list is also under Website and Sales.
- Click the provider card and open the Credentials tab. Paste the keys from the provider dashboard.
- Generate the webhook if the form offers the button (Stripe and PayPal do), or add the webhook URL manually in the provider dashboard.
- Set the State field. Use Test Mode with sandbox keys first. Switch to Enabled with live keys when you are ready.
- Check the Published button. An enabled provider is published on your website automatically, while a provider in test mode stays unpublished by default.
- Review the Configuration tab: payment methods, saved cards, manual capture, express checkout, countries, currencies and the payment journal.
Tip: if a payment method does not show up at checkout, turn on developer mode and click the small bug icon next to Choose a payment method on the payment form. Odoo shows an availability report explaining exactly why each provider or method is hidden.
Setup examples: Stripe, PayPal and Razorpay
Stripe
Stripe is the most common choice for Odoo shops in the US, UK, Europe and many other markets. It supports saved cards, refunds from Odoo, manual capture and Apple Pay / Google Pay. (Odoo Stripe docs)
- On Odoo Online: open the Stripe provider and click Connect Stripe. Go through Stripe’s onboarding, confirm your email, then click Agree and submit. You are sent back to Odoo with Stripe enabled.
- On Odoo.sh or on-premise (or to link an existing account): in Stripe go to Developers › API keys and copy the Publishable key and Secret key. In Odoo, turn on developer mode, paste both keys in the Credentials tab and click Generate your webhook.
- Apple Pay: in the Configuration tab, tick Allow Express Checkout and then click Enable Apple Pay.
PayPal
PayPal is popular because so many buyers already have an account and it has no monthly subscription fee. (Odoo PayPal docs)
- In the PayPal Developer Dashboard, open Apps & Credentials, click Create App, and copy the Client ID and Secret.
- In Odoo, enter your PayPal account email, the Client ID and the Client Secret, then click Generate your webhook.
- Important: if your customers have accented or non-Latin characters in their names or addresses, set PayPal’s button encoding to UTF-8. Otherwise payments can fail without any visible error.
- For testing, PayPal gives you a sandbox business account (merchant) and a sandbox personal account (buyer).
Razorpay (India)
Razorpay supports more than 100 payment methods popular in India. (Odoo Razorpay docs)
- Indian companies can click Connect on the provider form and finish onboarding in a few steps. Note that this quick flow does not support test mode.
- For manual setup, copy the Key Id and Secret Key from Account & Settings › API Keys in Razorpay.
- Add a webhook in Razorpay pointing to your database URL followed by
/payment/razorpay/webhook, choose a secret, and enable these events:payment.authorized,payment.captured,payment.failed,refund.failedandrefund.processed. - Paste the Key Id, Key Secret and Webhook Secret into Odoo.
- If you use manual capture, keep in mind that Razorpay does not support voiding from Odoo, and payments left uncaptured for more than five days are voided automatically.
- Recurring payments need to be activated by Razorpay support before subscriptions will work.
Example Razorpay webhook URL:
https://yourcompany.odoo.com/payment/razorpay/webhook
Key features to configure
Saved payment methods (tokenization)
Turn on Allow Saving Payment Methods and customers can store their card for next time. Odoo saves only a token, a reference that points to the card stored safely at the gateway. This is what makes one-click reorders and automatic subscription billing possible. Customers can remove saved cards from Manage payment methods in their portal.
Manual capture
With Capture Amount Manually, the money is reserved on the customer’s card but not charged until you click Capture Transaction on the order or invoice. You can also click Void Transaction to release it. This is useful when you:
- Only want to charge once the order ships
- Want to review high-risk orders before charging
- Want to avoid refund fees (voiding an authorisation is usually free)
- Hold a security deposit for rentals
Keep in mind that authorisations expire. The exact window depends on the provider and card network, so check your gateway’s documentation.
Refunds from Odoo
With supported providers, open the payment and click Refund. Stripe, Adyen and Razorpay allow partial refunds; Authorize.Net supports full refunds only.
Express checkout
Allow Express Checkout adds Apple Pay and Google Pay buttons to the cart. Shoppers skip the address form and go straight to the confirmation page. Prices on the express form always include tax, so double-check your tax setup.
Availability rules
In the Configuration tab you can limit each provider by country, currency and maximum amount. Odoo 20 also adds a minimum amount and a pricelist filter. This lets you, for example, offer cash on delivery only for small orders, or show a B2B provider only to wholesale pricelists.
| Feature | What it does | Where to switch it on |
|---|---|---|
| Saved payment methods | Stores a token for repeat and recurring payments | Configuration › Allow Saving Payment Methods |
| Manual capture | Authorise now, charge later | Configuration › Capture Amount Manually |
| Refunds | Refund full or partial amounts from Odoo | Payment record › Refund (no setup needed) |
| Express checkout | Apple Pay and Google Pay buttons in the cart | Configuration › Allow Express Checkout |
| Availability | Limit by country, currency, amount and (Odoo 20) pricelist | Configuration tab |
| Payment journal | Where the payment is recorded in accounting | Configuration › Payment Journal |
Testing without touching real money
Never test a new gateway directly on your live database. A test payment still creates real sales orders, invoices and sequence numbers, and those are painful to clean up.
Here is a simple test plan that catches most problems:
- Duplicate your database, or use an Odoo.sh staging branch.
- Set the provider’s State to Test Mode and enter the sandbox or test keys from the provider dashboard.
- Run a successful card payment and check that the order is confirmed and the invoice is paid.
- Run a declined payment and make sure the customer sees a clear message.
- Test a card that requires 3-D Secure, if your market uses it.
- Close the browser tab right after paying. The payment should still be confirmed through the webhook.
- Issue a full refund and, if supported, a partial refund.
- If you use subscriptions, check that the saved token is charged on the next billing date.
- Confirm that the payment shows up in the right journal and outstanding account.
Once everything passes, switch to live keys on your production database, set the State to Enabled, and make one small real payment yourself before announcing anything.
The accounting side: journals and reconciliation
This is the part that finance teams care about most, and the part that is easiest to get wrong.
Every payment provider needs a payment journal, and it must be a Bank type journal. By default, Odoo uses your main Bank journal for every provider. That works, but it makes reconciliation harder because all the money from Stripe, PayPal and bank transfers ends up in one bucket.
A cleaner setup that most accountants prefer:
- Create a separate Bank journal for each gateway (for example, “Stripe” and “PayPal”).
- Give each provider its own outstanding account, so you can see at a glance how much money is sitting with the gateway and has not yet reached your bank.
- When the gateway pays out to your bank, reconcile the payout against the outstanding payments, and book the gateway fees as an expense.
Gateways usually pay out in batches, minus their fees. So one bank line of, say, $4,812.40 might cover 63 customer payments and $187.60 of fees. Planning how you will match those up before go-live saves hours every month. Odoo’s own documentation recommends asking your accountant how the journal entries should be recorded for third-party providers.
Card terminals for Odoo Point of Sale
Online payments and in-store payments are configured in different places. For a physical shop, Odoo Point of Sale connects to card terminals from these providers: Adyen, DPO Pay, Ingenico, Mercado Pago, Mollie, Pine Labs, QFPay, Razorpay, SIX, Stripe, Tyro, Viva.com and Worldline.
To set one up, open the POS settings, activate the terminal under Payment Terminals, then create a payment method with a Bank journal, set Integration to Terminal and choose the terminal in Integrate with. When the cashier selects that method, the amount is sent to the terminal and the order is validated automatically once the card is approved.
Using the same company (for example, Stripe or Adyen) for both your website and your shop keeps reporting and payouts in one place.
When you need a custom payment integration
Sometimes your preferred gateway is not on Odoo’s list. This is common with local banks, regional wallets and some newer payment companies. You have three options:
- Check the Odoo Apps Store. Community and partner modules exist for many gateways. Check that the module supports your exact Odoo version, is actively maintained, and comes from a vendor you trust, since it will handle payment data.
- Use a payment link from the gateway. For low volumes, you can send the gateway’s own payment link and register the payment in Odoo manually. Simple, but it does not scale.
- Build a custom provider module. This gives you the same experience as the built-in connectors. It is the kind of work an Odoo customization partner can handle for you.
A custom module normally extends Odoo’s standard payment framework instead of building something separate. In simple terms, it:
- Adds your gateway as a new option on the
payment.providermodel, along with fields for its API keys - Extends
payment.transactionto send the payment request to the gateway and to process the response - Adds a controller that receives the customer’s return and the gateway’s webhook, and checks the webhook signature
- Links the gateway’s supported methods to
payment.methodrecords, and usespayment.tokenif card saving is supported
The internal method names in the payment framework have changed between Odoo versions, so the best reference is the source code of a built-in provider for your exact version, such as the payment_stripe or payment_adyen modules in the Odoo GitHub repository. Plan time for webhook security, retries, refunds and testing, not just the happy path.
Security and PCI compliance
Card security is a big reason companies hesitate, so here is the short version.
Odoo does not store or process card numbers. The certified payment provider handles all sensitive data, and Odoo only keeps a reference number or token. As the Odoo documentation explains, this means Odoo customers usually only need to complete the shortest PCI DSS Self-Assessment Questionnaire (SAQ) with their provider to get their Attestation of Compliance. Odoo should not be listed as a payment processor in that questionnaire.
You can read more about the questionnaires on the PCI Security Standards Council website. A few good habits on your side still matter:
- Keep API secret keys out of emails, chat messages and shared documents.
- Give access to the payment provider settings only to people who need it.
- Rotate keys if a staff member with access leaves or a key may have leaked.
- Use HTTPS on your Odoo domain (Odoo Online and Odoo.sh do this for you).
- Turn on two-factor authentication on both Odoo and the gateway dashboard.
Common mistakes and how to fix them
| Problem | Likely cause | Fix |
|---|---|---|
| Payment succeeded at the gateway but the order is still pending in Odoo | Webhook missing, wrong URL or wrong secret | Regenerate the webhook in Odoo or recheck the URL and secret in the provider dashboard |
| Payment method not visible at checkout | Country, currency or amount filter, or provider not published | Use the developer-mode availability report on the payment form |
| PayPal payments fail silently | Encoding not set to UTF-8 for names with accents | Set PayPal button encoding to UTF-8 |
| Invoice numbers have gaps after testing | Tests were run on the live database | Always test on a duplicate or staging database |
| Bank reconciliation does not match | Payouts are net of fees and grouped | Use a separate journal and outstanding account per provider and book fees separately |
| Subscription renewals fail | Saved payment methods disabled, or recurring billing not activated at the provider | Enable tokenization and confirm recurring support with the gateway |
Final thoughts
Integrating Odoo with a payment gateway is mostly a configuration job, not a coding project. The built-in connectors for Stripe, PayPal, Adyen, Razorpay and others are solid, and the hard parts are usually outside Odoo: getting your merchant account approved, setting up webhooks correctly, testing safely, and agreeing with your accountant on how payouts and fees are recorded.
Take it one step at a time: pick a provider that fits your market, test everything on a copy of your database, set up clean journals, and go live with a small real payment. Do that, and the payment step becomes the part of your Odoo system you never have to think about.
Need a hand? The Syncing Soft team helps businesses set up, migrate and customise Odoo ERP, including payment gateway integrations and custom Odoo modules. Get in touch and tell us what you are trying to build.
Frequently asked questions
Which payment gateways does Odoo support?
Odoo 19 and 20 include built-in connectors for Adyen, Amazon Payment Services, AsiaPay, Authorize.Net, Buckaroo, DPO Pay, ECPay, Flutterwave, Iyzico, Mercado Pago, Mollie, Nuvei, Paymob, PayPal, PayU, Razorpay, Redsys, Stripe, Toss Payments, Worldline and Xendit, plus wire transfer, SEPA Direct Debit, pay on site and cash on delivery.
Do I need a developer to connect Stripe or PayPal to Odoo?
No. For supported providers you only need to paste the API keys into the provider form, generate the webhook and enable it. A developer is only needed for unsupported gateways or unusual workflows.
Does Odoo store credit card numbers?
No. Card data stays with the payment provider. Odoo stores only a reference or a token, which is why you usually only need the shortest PCI self-assessment questionnaire.
Can I use more than one payment gateway in Odoo?
Yes. You can enable several providers at once, and Odoo shows each customer only the ones that match their country, currency and order amount.
How do I test a payment gateway in Odoo?
Set the provider State to Test Mode, enter the provider’s sandbox keys, and run test payments on a duplicate database. The Demo provider is also available for testing business flows without any credentials.
Can I integrate a local bank or wallet that Odoo does not support?
Yes, by installing a trusted third-party module or by building a custom payment provider module that extends Odoo’s payment framework.
References
- Odoo 19 documentation: Online payments
- Odoo 20 documentation: Online payments
- Odoo documentation: Stripe
- Odoo documentation: PayPal
- Odoo documentation: Razorpay
- Odoo documentation: POS payment terminals
- Stripe documentation: API keys
- PayPal Developer
- Razorpay documentation: Webhooks
- PCI Security Standards Council
- Odoo source code on GitHub (payment addons)